
A Dark Theme for Snow Leopard
Intro
FreeTheLlamas@gmail.com
Table of Contents?
A system wide makeover for Snow Leopard
Pretty Much How to:
*Reformat the Menu Bar to become translucent black
*Use GeekTools to get Time, Date, and other info on your desktop
*Go Dark in iTunes/Firefox
*Manipulate both your login screen and Boot Image
*Use CandyBar and the Internet/DeviantArt to reformat your system icons
Just scroll down and look for large font similar to this to mark each section. It goes in order, so no worries.
The point of this is essentially to present how to create a black ‘dark’ theme for snow leopard in a very easy DYI style, easy cause I’m pulling all the parts together for ya. When i tried this out my first time a few days back it took me a few days to get everything down right, scouring the internetz for others on similar quests. Essentially, after a few days and countless hours searching, I managed to pull together what I would personally consider an aesthetically pleasing desktop for my Macbook, it looks more or less like this. Desktop Screenshots are very popular online, everybody likes to brag 🙂
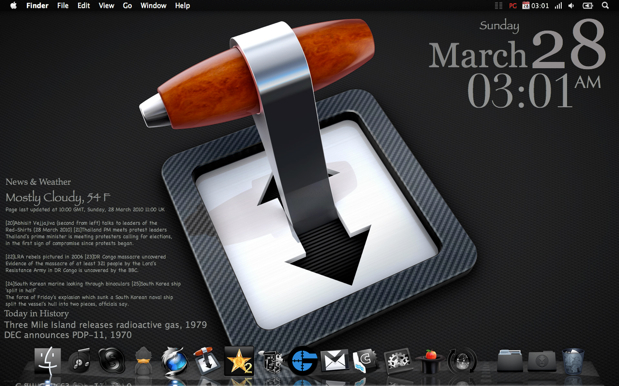
Now… this is fairly extensive, but if you have all the parts set up already it’s really fairly simple, and shouldn’t take more than maybe a few hours, but it is well worth it in my humblest of opinions. The theme is, need I say, dark transmission. An awesome app a buddy of mine, Raadgie, tipped me off on, and after seeing this insane wallpaper I had to go with it. The biggest aspect of this whole project is that I’ve done nothing more than pull together what others have created. I am by no means an artist or programmer, so credit where credit’s due.
Quick info for those curious, this tutorial is ridiculously in depth and long, take what you need from it. Also, this has been created on my iMac, but the actual modded computer is my macbook, so the how to bit will show screenshots very much undark at times.
Steps…
Really this part is up to you i suppose. I went at this whole thing with a random shotgun style just finding what I could and implementing it along the way, but that might or might not be your style. If you want cohesion and something to wrap your mind around, start with a picture of what you want to end with, the biggest aspect of this being your desktop background. Pick the background first, and after that model whatever you do to fit it. Mine is pretty awesome, and in case you’d like a copy here’s a link.
This is absolutely essential, YOU NEED SOFTWARE. Unless you are some mega-hacker genius of course. So be prepared to download a lot of stuff if you really want to go all in and mod your computer. Luckily the things I used for the most part are free, except for one…
The only app that I highly recommend you need to have that actually requires payment is called ‘CandyBar’, and can be found here. It is extremely helpful in system wide mods, and makes your computer look very nice for minimal effort.
There’s a huge list of apps out there that you could use, some freeware, some donation-ware, others shareware, and still many many more that require some monetary concessions on your part. THE ABSOLUTE MOST IMPORTANT APP is CandyBar. Not to be melodramatic, but without it a lot in your system will be lacking for many reasons. With it you can easily change nearly any icon in your system, from folders to hard-drives and apps, and at the same time keep everything easily reversible in case you ever want to change stuff around or go back to the good times with default icons. The only thing is the damn thing costs 29 bucks, which for some may be affordable, and for others not so much. Do what you can I guess. I’ll link to everything you need for each part as we go through this thing.
.
Menu Bar
Hardest things first alright? If you can pull this off without a hitch, then you’re set to go for the rest of this tutorial thing easy easy.
This ‘menu bar’ that I speak of is the thing at the top of your screen, forgive me if I’m talking to much in depth but I want to cover all my bases 🙂
 (click it to see it in HD!!! it looks quite awesome in real life!)
So now you know.
The trick here is getting this thing to turn black, so it fits the whole dark thing. If you leave it as it is it’ll generally be a huge distraction from the whole setup being so dark, and really it’s a lot more impressive if you have a dark menu bar to show off.
NOTICE: MAKE BACKUPS OF ALL FILES YOU DELETE OR MODIFY
If you do anything wrong at all, or ever want to reverse what you’ve done, you’ll need the original files you’ve modified. And you really don’t want to have to reinstall your complete OS because of a mod gone wrong.
Step One
Right Click on the desktop and choose ‘Change Desktop Background’, then in the window preference pane that pops up uncheck the button ’Translucent Menu Bar’, this is necessary so that the mod we implement doesn’t look really weird.
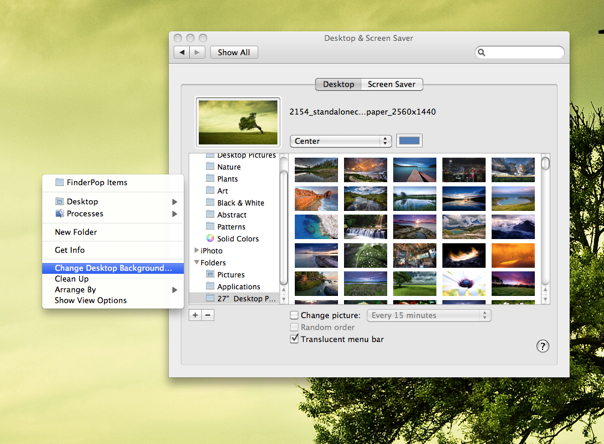
As demonstrated above….
This is where things start to get a bit more difficult, but really this is all stuff that’s been done for us by some real pro’s.
Go to this link for post #22, where a very amazing person ‘KristaffaH’ has uploaded a .zip document that will transform your menu bar. Download it here if you want to not visit that site for any reason. (I believe this mod was created using Themepark 4, a free app that allows you to mod Macs)
This file, when unzipped, will provide you with the following things.

Ya. Two files ‘Files’ & ‘Icons’ with a read me file. It is ESSENTIAL that you read the readme file, i know a lot of people tend to zone those out, but this time it’s really really important that you read it and follow the directions to the t, but hold up, one more thing.
One caveat to complicate things unnecessarily…. if you want to have drop down menus that highlight in blue just use the file shown above, but if you want menu’s that highlight in black (shown below) download this file and substitute this SArtFile.bin for the one included in the package above.
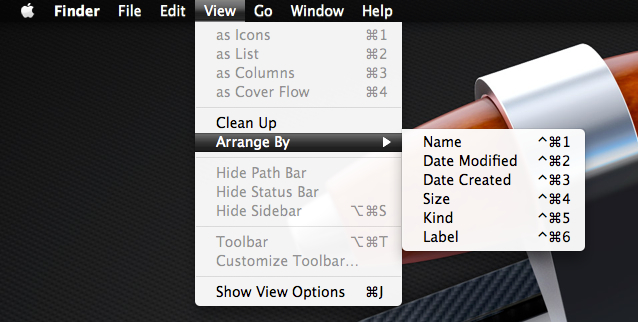 Black vs Aqua
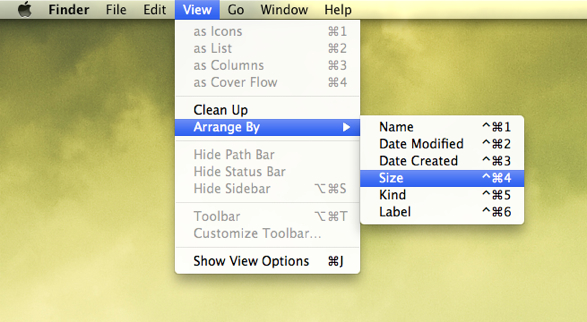
I personally did download that extra file and replaced the original SArtFile cause i thought the idea of having black dropdown menu’s was quite cool.
The hard part now is following the directions of the readme file, which really… considering how nice the creator was…. is not that hard at all. Word for word the gist of the readme is that you have to use the shortcuts provided in the original downloaded file (the folders with little arrows in the bottom corner), and first delete the original ‘Extras2.rsrc’ and ’SArtFile.bin’ files using your admin password, and then just dragging those downloaded files with the same name into the shortcut folders. You also have to replace the menu bar icons (like the airport and spotlight icons) because a black menu bar with black icons really won’t work.
ONCE AGAIN, BACK EVERYTHING UP. Anything you delete, make sure you copy it to a backup folder first, just in case.
After this, making sure to follow the readme file’s instructions very very very carefully, reboot your computer (I’ve heard relogging in works, but I’ve never tried). If you installed correctly, everything should be fantastic, and you should have a very nice dark menu bar. If you left the translucent menu bar feature clicked in or go in now and click it you’ll see that it makes the menu bar look all funky, and to make it revert back to the translucent black you’ll have to log out and back in.
The issue now is that the black menu bar will mess with a lot of apps that function up there, and if they have black icons… you won’t be able to see them. There are a few workarounds though. First off, install the nice and free iStat Menu so that you can utilize a clock in that corner of your screen because the original will be invisible. A feature of istat is that you can choose to have it show the time in white font, allowing it to be the lifesaver here. Just set the preferences to not show the default clock by clicking the time, then clicking ‘Date & Time Preferences.’ After that just uncheck ’Show date and time in menu bar’ and you’re good to go.
All in all, after this step, you should have a very nice looking black menu bar that should look insanely awesome.
GEEKTOOLS FOR DESKTOP FEATURES
Next, a slightly different objective.
 &
& 
This is a neat feature I just recently discovered, called GeekTool. Get it here, the site is here, and it’ll blow your mind with the stuff you can do. The basic idea is that this is a preference pane that is installed in your system preferences app, and will allow you to embed images, texts, and scripts on your desktop with the use of a few lines of code (definition thanks to Greg Loesch, who wrote an entertaining and infinitely helpful article on how me modded his desktop using GeekTool).
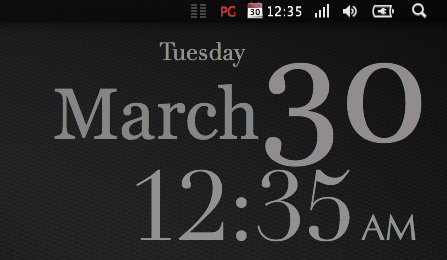
Let me walk you through the easy steps here on how to get the date, time, weather, and news on your desktop.
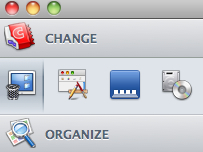
After you’ve installed GeekTools go into the app System Preferences and click the icon of a screen labeled ‘GeekTool’ under the Others section.

Yes, the one three over and five down from the top, if you want to go with that 🙂
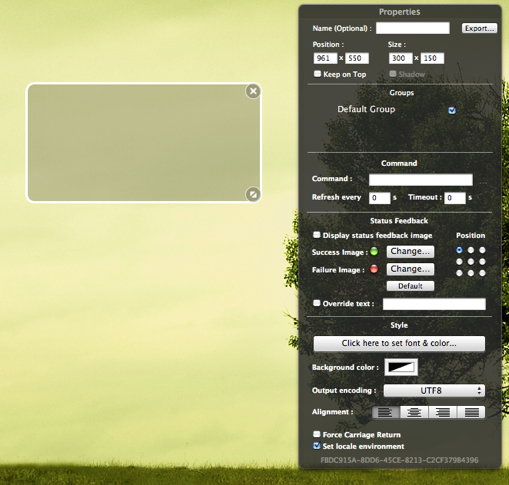
Once you’ve clicked on that you should see a screen that essentially goes like this.

Yeah, that’s it. Now, all you have to do to get started is click and drag that picture labeled ‘Shell’ onto an empty spot on your desktop. A black box will appear, along with a black box into which you type all the preferences and code. It looks scary, to some people, but really it’s fairly simple. All you have to do is input code into the white box labeled ‘Command’. This is what you should be seeing.
Anything you want to show up on your screen, all you have to do is input the correct command script and it will do what you wish of it. Scripts can easily be obtained through a quick ‘GeekTool scripts’ google. Following are a few links to helpful sites with a plethora of scripts, along with a few of my simplest script functions for such things as News and Time. Make sure that you input some number into the ‘Refresh every’ box, otherwise your scripts won’t update until you reopen GeekTools. I’d recommend something like 60 for most and 10 for the time.
he things you can put on your desktop are insane, from time to date, and news to software info. Here are a few links.
A manual created by Shaded of MacThemes (It’s nicer than what i’ve got here, so dig in)
An article by Milind Alvares of Smoking Apples (plenty of codes and info)
Codes I’ve found…. scattered places…. like those links I just mentioned. The one’s i’m currently using:
Day of the Week:
date +%A
Month:
date +%B
Day of the Month:
date +%d
Time (12 hour clock):
date +”%I:%M”
AM/PM:
date +”%p”
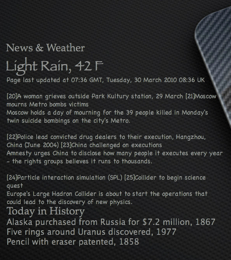
BBC News:
This is slightly harder. You need to first install a text web browser thing called ‘Lynx’, found here. When installing it will ask for your password in a terminal style setting, just type it in, you won’t see any text go in but after you finish typing hit enter and it will install for you.
Download this and put it into your Home folder.
The code is as follows
sh /Users/YOURUSERNAME/new.sh News Front Page
substitute the last bit ’news front page’ for any of the following
News Front Page | Africa | Americas | Asia-Pacific | Europe | Middle | East | South Asia | UK | Business | Health | Science & Environment | Technology | Entertainment | Also in the news | Have Your Say
Read the MacThemes manual for other options and other RSS feeds, this bit is especially straight outta there.
Weather:
You also need the Lynx browser and the news.sh file for this, just follow the above instructions
The code is
curl –silent “http://xml.weather.yahoo.com/forecastrss?p=uswa0468&u=f” | grep -E ‘(Current Conditions:|F//‘ -e ’s///‘ -e ’s/<\/b>//‘ -e ’s///‘ -e ’s///‘ -e ’s/<\/description>//‘
Change the highlighted text to your yahoo area code, should start with US and your state. You have to mess around with yahoo weather but eventually something that looks like that will pop up in your browser bar. This can be easily modified to show the temperature in Celsius, refer to the manual.
Today in History:
grep -h “^$(date ‘+%m/%d’)” /usr/share/calendar/calendar.{holiday,history,computer}|cut -f2
With all of these codes, once you’ve set them up, make sure to modify the text color and font to make it look interesting or stylish or whatever. This is really all there is too it.
A DARK THEME FOR FIREFOX AND ITUNES
So, now for the easy bit, iTunes and Firefox.
To go dark in iTunes is actually really really simple, and a nearly universal thing that I’ve run across time and again with others. The trick is called ’Silent Night for iTunes 9’ by =DaHLiA-7 on DeviantArt. Available for both Windows and Mac, this is quite the nice mod. Get it here. Or just download it here. The uninstaller is a separate link, on the page of the first link.
It looks as so.
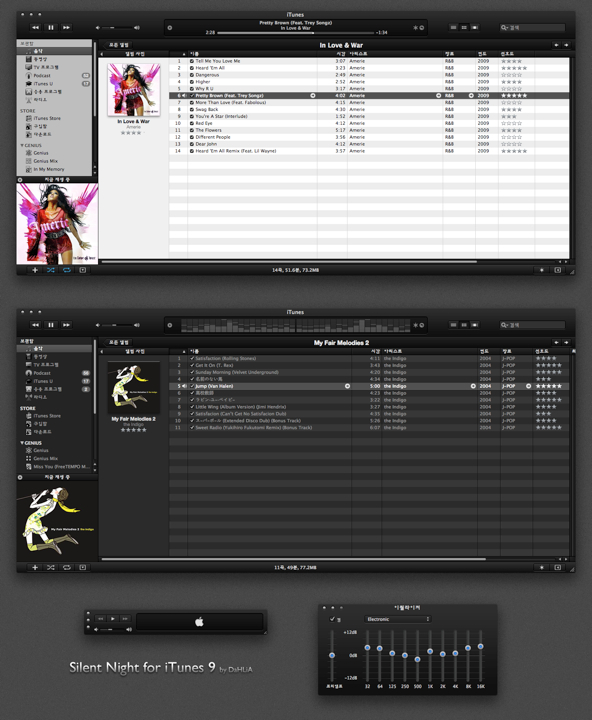
Quite a nice change of pace I have to say. And the nice thing about this is that the download comes with an installer, so all you have to do is click to install and then log out and back in.
Here’s what mine ended up looking like.

I used cover stream to allow me to see my playing music on my desktop in an easy way, it costs some but it’s a hellava lot easier than messing around with GeekTools in order to make iTunes work properly.
For Firefox the change in theme is extremely easy as well. Even easier in fact, because you don’t have to install jack. All you need to do is go to the new ‘Persona’ feature Mozilla has come up with. The themes of yesteryear are pretty boring and when compared to how easily you can switch, browse, and try out persona’s, there’s a significant difference.
The one I used is called ‘Dark Fox’ and you can check it out here. There are hundreds more dark theme’s on that site, just search around for a theme you like. Also, I made Blackle.com my home page, so it looks pretty interesting when the two are paired together. Eh?

Yes it was 3AM when i took that screenshot. Gooood times. lol.
THE BOOT & LOGIN SCREEN
So, another easy easy bit. Two points. The first takes a simple app called BootXChanger, and all this really does is modifies the tiny icon you see when booting your computer. The official website is here. The only problem is that this app is very very very constrained by the Intel chipset for some reason, and if you intend to use an image you create, you’ll have to get the number of colors in the pic really low or else it won’t work. the app does come with a fairly nice sample set of viable pics, try them out. I got mine from this MacThemes forum thread discussing BootXChanger, props to Bm4n.

Make sure you read the info on the website and the readme, the app won’t let you do anything stupid, but it’s best to know what you’re getting into here.
The second part is making your login screen look very very nice, and this is done through a helpful app called MacPilot that let’s you customize numerous bits of your computer. Check it out over here. Sadly this one also costs some cash, but for some it might be worth it, at least try out the 15 day trial. The app looks as so.

Essentially you can modify a lot of stuff all over your computer, but my primary concern is the ‘Login Window’ section within which I set my desktop picture and… welcome text. This is what my login screen looks like 🙂

Cool to get a system wide effect that will impress a few noobs out there. Yeye.
If you so choose you can also modify the default desktop image used for all new accounts by following the path MacHD/System/Library/Core Services/DefaultDesktop.jpg and replacing that picture with one of your own.

SYSTEM & APPS
Now that I’m assuming you’ve suitably thought through to what kinda background you’d like, let me demonstrate the most time consuming part of this whole procedure. Using Candybar (or a free less powerful equivalent), and modifying your app icons with replacements downloaded off the internet, or creating your own replacements with whatever inherent skill you might have in photoshop (I’ve tried with zero experience and very very moderate success). The basic theme for black would be ‘Onyx’, so google accordingly if you so choose. I just mass spammed the internet with searches that go along the lines of ‘dark mac theme icons’ and ‘dark app icons’, all of which worked fairly well. Over the course of this I discovered the site ‘DeviantArt.com’, home of graphic designers the world over. There are literally millions of app icons there, and a simple search will unearth more than you could ever possibly hope for in your wildest dreams.
There are two ways to go about modding your apps, by either using candybar or its free less powerful equivalent LiteIcon, or else manually going into the app itself and replacing the icon there. This is done by first choosing the app you would like to modify, and then right clicking it. Click ‘Show Package Contents’ and you should see this new finder window show up that says ‘Contents’. This is where everything that makes up the app pretty much goes, and if you follow the path Contents->Resources-> ‘AppIcon.icns’ you can modify the icon by first removing the icon residing there and replacing it with whatever you want, making sure to rename it to exactly what the file you found in there was. Fairly simple.
![]()
I discovered this myself by accident a few years back when I was just messing around, good times…
Just fyi, I have no clue how to use this method to replace icons for system wide icons like generic folders, but I’m pretty sure there’s a way if you open up some system apps like the finder… but that’s uh… pretty dangerous stuff. If you like living on the edge go for it, otherwise stick with CandyBar.
Moving on to the meat of this topic, reformatting your system to look Dark themed awesome.
Currently, I have two black icon folder replacement sets in my vast 4k large CandyBar library (the result of mass downloading everything I saw on the internet). As a favor, I’ll show you what I’ve got, and link you to where you can download them 🙂
Edit system wide folders and other stuff in CandyBar under the tab sporting the desktop+trashcan image.
Choice A)
My personal favorite, and what I’m using, Alumi Black by Joy-Vincent Niemantsverdriet & Erc Vider

Quite awesome is it not? Regardless, I chose this because (while it is lacking in overwhelming system wide choices) this set has a certain sense of class that appealed to my… other side.
Choice B)
Another very nice set, part of the Agua series, by David Lanham

I incorporated this for all the things that the Alumi Black series didn’t cover (It really seems like it should be Alumni…). Namely, such things as server icons, trash can, and external drives. There is one notable deviation from these sets that I used, which was the internal hard-drive icon that I found irresistible.
Part of David Lanham’s Agua Extra’s Vol.1
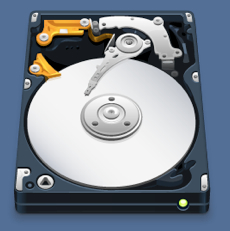
This is quite awesome, and in my glances over other people’s desktop screenshots I’ve seen this one pop up quite a few times. There are other variants of this, some sporting what your internal HD legitimately looks like, a matter of style up to you.
Also, one of the funner bits is choosing what you want your finder icon to be. Believe me, I spent way more time on this than I should’ve. A snapshot of what I had to choose between.

I ended up picking the one on the far left over the Alumi one, mostly because it does look pretty damn good. A close race though.
Now that I’ve shown you a few good options for setting up your dark themed system, the next step within CandyBar is to set up your apps to a black scheme that fits your taste. Or not. Choosing if you want to use dark icons for your apps is something that is completely up to you in every sense, many go both ways, and if you choose to take the easier possibly more aesthetic road of not modifying your apps you’ll save yourself an hour of trouble and possibly more on the internet searching for exactly what you need.
^There’s a pun up there, and I’m ashamed of it.
BUT, if you so choose to go the way I did and see if you can pull off a stylish black app collection, go all the way. It really helps if you don’t have a huge collection of apps to modify though. It helps a lot if you have a nice premade selection of icons to pick from, such as this woodwork set, made by somebody (they didn’t include their name so for now they go uncredited, so sorry…).

Or else this very very nice custom set by Ata
![]()
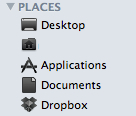
Make sure you don’t forget to check this nice set out, created by Gpopper. this is specifically for your sidebar in the finder, so the low res of these icons is understandable.
![]()
This thing if you don’t know exactly what I meant.
Lastly, and by lastly I mean thank God it’s finally reaching a last, change up your dock to look nice. I’d recommend this style of ‘glass by Kano89’, mainly because it fits with so many backgrounds and styles, and it’s both nearly invisible and stylish all at the same time. Implement it with the free Dock Library, or any of a number of other apps including CandyBar. Docks are everywhere, and you can find a number at sites like this or DeviantArt…. etc etc.
Really any of a million sites offer nice icons by awesome designers sharing the wealth. The number one place I went to look specifically for icons was DeviantArt, but the place I went to mass spam download icon sets was CandyBar’s one and only iconfactory, the land of thousands of free icon sets dating back years. Also straight up google.
At the end of this day, it’s really all up to you, go wild like me or just stick with what you already got. Using Bevy I can show you the relatively minor icon reformat I pulled off on my theme’d MacBook. This is where I more or less show off my minor collection, but whatever.

Overall, that’s about all there is to a complete revamp of your Mac system to go black. Me sharing the wealth, hope you got something out of all this.
.
Links &
Resources
Close to everything I used, but there were so many it’s honestly hard to keep track. Sorry if some stuff gets left out, I try. And really, too much for me to actually tag individually to make it useful atm. Maybe later, maybe not.
My email is FreeTheLlamas@gmail.com, email me in case you want to request an upload of icons, or maybe a vid tutorial, or anything at all really. Cheers.
http://www.bergdesign.com/bevy/
http://blogof.francescomugnai.com/2009/04/mega-roundup-of-geektool-scripts-inspiration-gallery/
http://forums.macrumors.com/showthread.php?t=628023
http://macthemes.net/forum/viewtopic.php?id=16793954
http://smokingapples.com/software/tutorials/how-to-geektool-your-mac-to-awesomeness/
http://blog.scottlowe.org/2010/01/11/a-couple-geektool-scripts/
http://greg-loesch.com/mac/272/spice-up-your-desktop-with-geektool/
http://projects.tynsoe.org/en/geektool/
http://dahlia-7.deviantart.com/art/Silent-Night-for-iTunes-9-140253861
http://iconfactory.com/freeware
http://namedfork.net/bootxchanger
http://macthemes.net/forum/viewtopic.php?id=16783146&p=1
http://www.aeroxp.org/board/index.php?s=b8cb07f94008944a5d15d53b11346d92&showtopic=12792&st=0 (Dark Menu Bar, if you look at this read through the pages to get the updates)
http://kano89.deviantart.com/art/Light-Leopard-Glass-Dock-113807222
http://www.dativestudios.com/docklibrary/
http://www.leoparddocks.com/index.php

Great Theme here! I love the black….Your tutorial makes things very easy. Couple things I’m not happy about with the menu butI’km looking for fixes. The dock is great! Thanks for the recommendation!
Shoot me an email and I’ll send you over a screen shot.
Do you know of a black themed Safari?
Jp
I have an issue. In my opinion, I did everything correctly but the menu bar just comes up a dark gray. I’m scared to do anything with the after effect of screwing up. Please help 😦
I had that problem too….
This is a great tutorial, but it seems to be missing something. How do you get the dark stripes and side bars within itunes? The theme only installs different graphics for the main window, not the windows within itunes. Also, how do you get white text on the title bars of apps? I have the menu bar all sorted, but itunes (for example) had black text on a black background which doesn’t work very well. Can you help?
[…] Enlace presionando aqui. […]
Black Mac OSX For Snow Leopard v2.0 « 13box Blog said this on January 1, 2011 at 7:57 pm |
Hello,
Nice post! I have done a whole black Snowleopard Theme and is in Deviant Art: http://www.deviantart.com/wavespell
I am sure it would make the life easier, visit that link for updates and downloads and also check my Youtube Channel Knomon: http://www.youtube.com/knomon
Greetz,
J
Finally! After Googling the whole Internet, a person with the right answer. Thanks.
[…] MacOS Theme Mod […]
rumnerden » Blog Archive » #32 Plus zu verkaufen said this on January 24, 2011 at 8:47 pm |